Insights
Specify an SSH Port When Connecting
Use ssh -p to connect on a specific port. Learn how to save the port in SSH config, select ports in scp and sftp, and check failed connections.

Use lowercase -p followed by the port number: ssh -p 2222 user@server.example.com. Replace the example port, username and hostname with the server's actual connection details.
ssh -p 2222 user@server.example.com
SSH uses port 22 by default. Specifying a different port changes the client's destination port, not the server's listening port.
Use the server's connection details
The right port is the one the server accepts for your authorized connection. Choosing an arbitrary alternate port will not move the SSH service there.
-
Obtain the connection details. Get the hostname or IP address, your authorized username and the configured SSH port from the administrator. Use the administrator-provided port when the server accepts SSH on a port other than the default.
-
Open a terminal with OpenSSH available. The command applies to the OpenSSH client on Linux, macOS and Windows. Connect only to a system you are authorized to access.
-
Run the command with your actual details.
ssh -p 2222 user@server.example.comHere,
2222is the destination port,useris the remote account andserver.example.comis the destination hostname. Keep the option lowercase and place it before the destination. -
Check the outcome. A successful login establishes that SSH was reachable and authentication succeeded using those details. If the connection fails, use the troubleshooting steps below rather than changing the server blindly.
This command makes no server configuration change, so there is no server-side change to undo. To try corrected connection details, run the command again with the corrected values.
Save the port for repeat connections
A saved host entry lets you reuse the hostname, port and username through a short alias. An explicit command-line port overrides the configured port, so you can still choose a different destination port for an individual connection.
-
Locate your client configuration and back it up. On Linux and macOS, use
~/.ssh/config. For Windows OpenSSH, use the.ssh/configfile under your Windows user profile. If the file already exists, make a backup before editing it and preserve unrelated settings. -
Add or update a unique host-specific entry. Place it before matching general defaults such as
Host *, not unconditionally at the end of the file.Host myserver HostName server.example.com Port 2222 User usermyserveris the alias you will type;HostNameis the actual destination. Replace the example values with the details you are authorized to use. -
Inspect the effective configuration before connecting.
ssh -G myserverCheck the effective
HostName,PortandUservalues in the output. This command evaluates configuration without opening a remote connection. -
Connect through the alias.
ssh myserverIf the effective values match the intended destination, this uses the saved connection details. A successful login, rather than configuration inspection alone, confirms that the destination is reachable and your authentication works.
OpenSSH normally uses the first obtained value for each configuration parameter. A later duplicate entry does not override an earlier matching value, so if ssh -G myserver shows unexpected details, review earlier matching entries and correct the relevant setting.
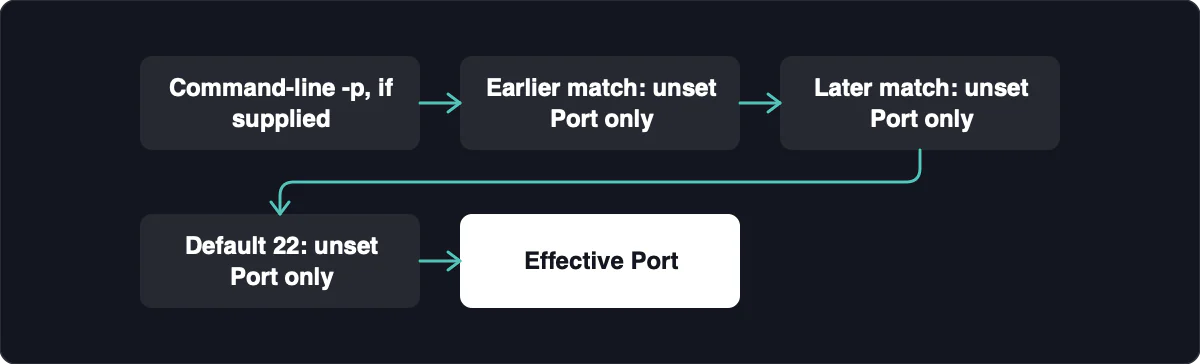
To reverse the edit, restore the backup if no subsequent changes need preserving. Otherwise, remove only the new stanza or undo the specific changes you made, leaving unrelated configuration intact.
Choose the correct option in other clients
Port-selection syntax differs between clients: OpenSSH ssh uses lowercase -p, while scp and sftp use uppercase -P. Use these terminal commands where the corresponding OpenSSH tools are installed; PuTTY on Windows uses a graphical field instead.
| Client | Port selection | Example or setting |
|---|---|---|
OpenSSH ssh | Lowercase -p | ssh -p 2222 user@server.example.com |
OpenSSH scp | Uppercase -P | scp -P 2222 file.zip user@server.example.com:/home/user/ |
OpenSSH sftp | Uppercase -P | sftp -P 2222 user@server.example.com |
| PuTTY on Windows | Session screen's Port field | Enter the hostname, set Port to 2222 and retain SSH as the connection type. |
The SCP example uploads the local file.zip to /home/user/ on the remote system. It requires authorized write access to that destination and may overwrite a file with the same name. Use a disposable example file and a destination you control; back up an existing remote file before replacing it.
To reverse a test upload, remove only the test file you created in the controlled destination. Removing the uploaded file does not recover an overwritten original, which requires its backup.
The SFTP command opens a file-transfer session using the selected port; it does not upload a file by itself. For both transfer tools, use the SSH endpoint details supplied for your access rather than assuming the example port applies to the server.
Check a failed connection without guessing
Client port selection is sufficient when the SSH service and authorized network path already support that port. When they do not, investigation must move beyond the client command, but the error message alone does not identify the cause.
-
Check the effective client destination. Review the hostname, username and
-pvalue in your command. If you use a saved alias, runssh -G myserverand inspect the effective destination, port and user without connecting. Remember that an explicit command-line-ptakes precedence over the saved port. -
Confirm the actual listening port. Ask the administrator which SSH port is available for your connection and whether the hostname or address is correct. A port that worked previously may no longer match the current service or access arrangement. Selecting
-pdoes not configuresshd, open a firewall or establish port forwarding. -
Separate connection errors from authentication errors. “Connection refused” records an observed rejection of the connection attempt; it does not uniquely prove that no service is listening. A timeout means the connection did not complete in time, not that a firewall necessarily blocked it. An authentication rejection is a different stage and calls for checking your authorized username, credentials and account access.
-
Investigate the authorized network path. For timeouts, check the network and destination address, then ask the administrator to review the applicable access rules. Confirm whether the destination requires a private route or another approved access path. Do not treat opening public access as the default fix.
-
Keep recovery access during an administrator-led change. If the administrator recently changed the listening port, retain the working session until the new setup is confirmed. Keep recovery access available as well, and verify a separate connection succeeds before closing the working session.
Correct client values establish what you are attempting to reach, not that the service is available. If those values are right but the connection still fails, give the administrator the destination, selected port and exact observed error so they can investigate the service and access path.
Keep remote administration on an authorized private path
A nondefault port is not an access-control boundary and does not make SSH undiscoverable. Changing the port does not, by itself, secure SSH, so do not treat it as a substitute for authentication or restricted access.
Use the chosen port on an authorized private route when one is available. Restrict administration access rather than opening it to the whole internet. The useful distinction is who can reach the service and authenticate, not merely whether its port differs from the default.
Keep destination-port selection separate from forwarding. -p selects the port used to reach the SSH server; -L, -R and -D request forwarding, with -D providing dynamic application-level port forwarding. You do not need a forwarding option simply because the server accepts SSH on a different port.