Insights
How to Change Your Wi-Fi Channel
Change your router’s Wi-Fi channel, choose settings for each band, test performance, and learn what to do if channel controls are locked.
To change your Wi-Fi channel, connect to your home network and sign in to your router’s official app or local admin page. Open Wi-Fi or Wireless settings, select the band you want to change, switch Channel from Auto to a supported channel, and select Save or Apply. For 2.4 GHz, start with channel 1, 6, or 11 at 20 MHz width. Your Wi-Fi may disconnect briefly, so reconnect and test before keeping the new setting; some provider-managed routers do not offer manual channel selection.
Change the channel in your router settings
You change the channel on the router, not separately on each connected device. Your devices normally follow the router’s channel automatically.
Menu names and management addresses vary by model. If available, connect your computer to a router LAN port with an Ethernet cable so changing the wireless settings does not interrupt your management connection.
- Confirm authorization. Work only on a router you own or are authorized to manage.
- Open the official management interface. Use the router’s official app, or find its local management address in the router documentation or your connected device’s network gateway details.
- Sign in as the administrator. The router administrator password may differ from the password you use to join Wi-Fi. Follow the documented access method rather than bypassing certificate warnings.
- Find the wireless controls. Look for Wireless, Wi-Fi, or Radio settings, then select the band you want to adjust.
- Record the current settings. Note the channel, whether selection is automatic, and the channel width before changing anything.
- Choose the channel. Switch from Auto to an available channel. Use the band-specific starting choices below.
- Save and reconnect. Select Save or Apply, allow Wi-Fi to resume, then reconnect your device and test.
If you lose access, reconnect by Ethernet or another supported Wi-Fi band. Restore the recorded settings or return channel selection to Auto.
Choose a channel for the band you use
A band is a frequency range, a channel is a portion of that range, and channel width determines how much spectrum the connection occupies. Choose the band first, then consider its channel and width together.
| Band | Starting choice | When to adjust |
|---|---|---|
| 2.4 GHz | Channel 1, 6, or 11 at 20 MHz width | Compare these choices when interference or inconsistent performance persists. |
| 5 GHz | Auto | For persistent drops, consider an available non-DFS channel permitted by your router’s regional configuration. |
| 6 GHz | Auto, where supported | Consider a manual trial only when your router supports it and testing shows a repeatable benefit. |
Automatic selection is often the better starting point on 5 GHz and 6 GHz. On 2.4 GHz, compare the recommended channels rather than choosing an apparently empty channel that overlaps neighboring traffic. If you use a compatible Wi-Fi scanning tool, consider competing signal strength as well as network count. A scan at the affected device’s location can guide a manual trial because nearby interference may differ from what the router observes.
Wider channels can increase potential throughput when spectrum is clear, but they also increase exposure to interference. Narrower channels can be worth testing in a congested environment. Use only channels your router permits for its actual region; do not change the country setting to unlock other channels.
Check local Wi-Fi performance before blaming the internet
A useful channel change produces a repeatable improvement where you actually use Wi-Fi. Compare the same activity under similar conditions rather than treating a single good result as proof.
- Establish a baseline before changing settings. Use the same device in the problem location. Record dropouts and the result of a repeatable activity, such as a file transfer or internet speed test.
- Use a local test where practical. Copy a non-sensitive test file between devices you own using an existing, authorized local sharing method.
- Change one setting at a time. Keep width unchanged while comparing channels, then test width separately if needed.
- Reconnect and repeat. Use the same device, location, file, and activity.
- Keep only a repeatable improvement. If results worsen or remain inconsistent, restore the previous setting or Auto.
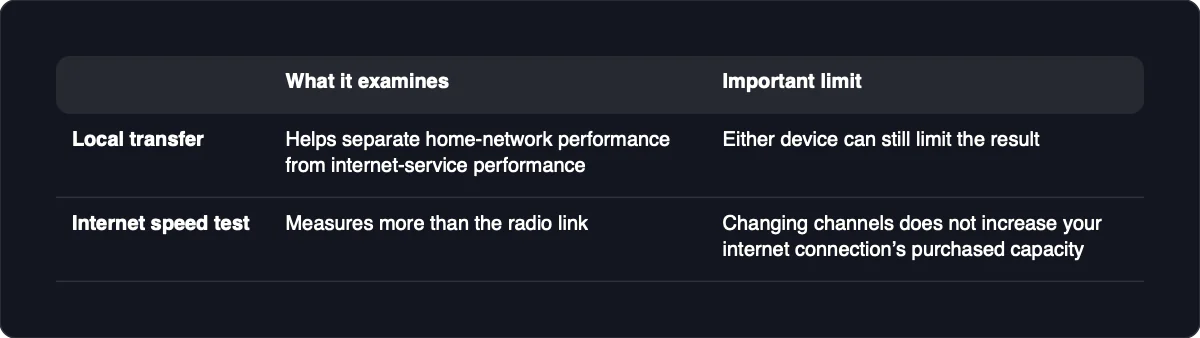
A local transfer helps separate home-network performance from internet-service performance, although either device can still limit the result. An internet speed test measures more than the radio link, and changing channels does not increase your internet connection’s purchased capacity.
Radio tuning and private communication are separate tasks. Changing a Wi-Fi channel does not add encryption, prevent tracking, or make your network private; you do not need to weaken security settings to test it.
If the channel setting is missing or locked
A missing or greyed-out channel control can reflect provider-managed automatic selection, not a mistake you made. Some provider-supplied routers do not expose manual channel controls.
- Check the exact model’s current documentation. Confirm whether it supports manual selection and where that control belongs.
- Check the official app. Advanced Wi-Fi settings may be managed differently from the browser interface.
- Ask the provider or manufacturer. Confirm which settings your equipment and service configuration support.
- Leave Auto enabled if manual selection is unavailable. Continue troubleshooting with the performance comparisons below.
Do not factory-reset the router merely to search for a missing control. Unsupported firmware or casual bridge-mode changes are not appropriate shortcuts for this task.
When a different channel does not fix the problem
A channel change can reduce interference and competition for airtime, but it cannot repair every coverage, device, or internet-service problem. Compare performance near the router with performance in the affected room, using the same device and activity.
If performance is good nearby but poor in the distant room, investigate router placement and coverage. If available, compare Wi-Fi with an Ethernet connection; poor performance over Ethernet makes channel selection unlikely to be the main cause. These results are diagnostic clues, not proof of a single fault.
If drops occur only on a DFS channel, consult the router documentation about radar-related interruptions and channel changes. Test an allowed non-DFS option rather than assuming every channel is available in every country or router model.
For persistent faults, give the provider or manufacturer your router model, firmware version, affected devices, and recorded before-and-after results. Include whether the problem occurs near the router, in another room, or over Ethernet so troubleshooting can move beyond repeatedly guessing channels.