Insights
Can You Access Your NAS From Anywhere?
Yes, you can access your NAS from outside your home network once you configure remote access.
Yes, you can access your NAS from outside your home network once you configure remote access. Your NAS and home internet connection must be available, and your remote device needs internet access and permission to connect.
Use a supported vendor remote-access service for browser or app access, or a private network connection for access to file shares. Your home NAS address alone is not enough when you are away, and remote access does not guarantee local-network speeds.
What you need before connecting away from home
“Anywhere” means wherever connectivity and network policy permit the connection. Live NAS access will not work offline, and a restricted network may block your chosen remote-access method. The NAS must remain powered on, connected at home, and available through the path you configured.
For example, a laptop on another internet connection can reach your NAS through an enabled vendor service or a properly configured private connection. Typing the home-only address into that laptop does not ordinarily establish a route back to your house. The remote-access path must exist before the address becomes useful.
Some vendor services can connect to a NAS over the internet without manual port forwarding. Private file-share access serves a different purpose: it lets you use files through your computer’s file browser rather than only through a website or vendor app. Choose the workflow before changing your router or NAS settings.
Choose browser access or a private file-share connection
Vendor browser or app access usually suits occasional file retrieval. A private file-share connection is more appropriate when you want a mounted share and regular read/write access. SMB, a network file-sharing protocol, provides the familiar shared-folder workflow.
| Method | Intended workflow | Software needed | Inbound connectivity | Maintenance responsibility |
|---|---|---|---|---|
| Vendor browser/app access | Browse, download, or upload through supported applications | Browser or supported vendor app | Supported remote-access services can avoid manual port forwarding | Maintain NAS software, accounts, and service settings |
| Supported private overlay network | Reach an authorized NAS address and mount a file share | Required network client and a supported NAS-side connection or route | Usually avoids manual forwarding; the NAS still needs a supported reachable path | Maintain clients, device authorization, routes, and access rules |
| Self-hosted home VPN | Reach permitted home-network services, including file shares | Compatible remote client and home VPN server | Requires a reachable VPN listener and appropriate router configuration | Maintain the server, router, authentication, and firewall rules |
A vendor service may provide browser-based access after signing in, but that does not mean it supports mapping an SMB drive. Similarly, a web reverse proxy is not a substitute for a private route that carries file-sharing traffic.
Private connectivity can preserve an SMB-based workflow away from home, but it adds network configuration to maintain. For an occasional document download, start with supported vendor access; for regular work in shared folders, choose a supported private connection.
Prepare the NAS while you are still at home
Make changes only to equipment and accounts you own or are authorized to manage. Keep local administrator access available throughout setup so a failed remote configuration does not leave you unable to recover.
- Confirm local file access. Open the intended share from a home computer and check the files you need. If local access fails, fix the NAS service, account, or folder permissions before adding remote connectivity.
- Check current support. Confirm that your NAS model, firmware, and chosen application support the remote-access method. Use the current instructions for that combination rather than copying an older setup.
- Apply supported updates. Update the NAS and relevant applications before enabling access. A private connection does not make deprecated firmware safe for remote use.
- Confirm a separate backup. Check that important files back up to an external drive or cloud destination. Another folder on the same NAS is not a separate backup destination.
- Create a personal non-admin account. Give it only the folders and read/write permissions you need. Reserve the administrator account for in-home management rather than routine remote file access.
- Enable multifactor authentication where supported. Apply it to the relevant vendor or remote-access account, while keeping its recovery method available. Do not assume that enabling it on a web portal also changes SMB authentication.
- Record the connection details. Note the intended share name, reachable address, and settings you change. Preserve the existing local connection for troubleshooting and rollback.
Keep file-sharing services private. Do not expose SMB or NFS directly to the internet, and do not publish the NAS administration interface as a shortcut to file access.
Set up the remote path and connect to your files
Use the procedure that matches your workflow. The exact menus and supported applications vary by NAS model, firmware, and remote-access service.
Vendor browser or app access
- Enable the supported service. Follow your NAS vendor’s current instructions from the local management interface. Use the service’s documented connection method rather than creating unrelated public forwarding rules.
- Sign in and restrict applications. Authorize the vendor account or device as required, then enable only the applications you intend to use remotely. Keep administrative access separate from ordinary file access.
- Connect through the official address or app. Use the service-provided address and the credentials it requests. For example, a supported vendor workflow can use an official access URL with your NAS account.
- Open the intended files. Confirm that your personal account sees the permitted folders. A working browser session establishes that application’s access, not that an SMB share can be mounted.
If HTTPS reports a certificate warning, stop and check the address and certificate configuration. Do not bypass the warning to complete setup.
Private file-share access
- Establish a supported route to the NAS. The NAS must join the private network through a supported method or be reachable through an explicitly configured routing device. Connecting a client on your laptop alone does not create a route to an otherwise unconnected NAS.
- Authorize the remote device. Install and connect the required client, then approve the device and its access under the network’s supported controls. Limit access to the NAS services you need.
- Allow the file service in the NAS firewall. Use narrowly scoped rules for the intended private connection and file-sharing service. Do not disable the firewall or forward SMB/NFS through the public router.
- Connect directly to the reachable NAS address. Use an address or hostname that works through the private path, then authenticate with your personal NAS account.
On Windows, enter this placeholder path in File Explorer’s address bar:
\\NAS_ADDRESS\SHARE_NAME
On macOS, open Finder’s Go > Connect to Server and enter:
smb://NAS_ADDRESS/SHARE_NAME
Replace NAS_ADDRESS with the address reachable through your private connection, and SHARE_NAME with the actual shared folder. Enter the NAS credentials when prompted; private-network authorization and NAS folder permissions are separate checks.
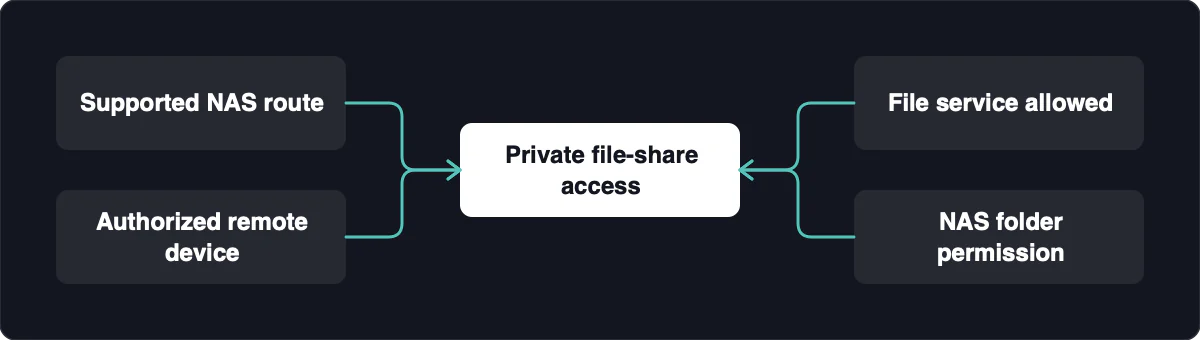
For a self-hosted VPN, follow current server and router documentation to make its listener reachable. Any required inbound rule belongs to that VPN listener, not the NAS file service or administration interface.
If setup fails, return through the preserved local administrator connection. Remove the newly added access rules, revoke unnecessary device authorization, and restore the previous configuration before trying again.
Test both file access and the permission boundary
A useful test checks both what your account can access and what it cannot. A successful file open proves that the tested path works; it does not prove overall security or the absence of public exposure.
- Leave the home network. Switch the remote device to mobile data rather than home Wi-Fi, or use another authorized external connection. This tests the remote path rather than ordinary local access.
- Sign in with the personal account. Connect using the browser, app, or private file-share method you selected. Avoid testing with administrator credentials, which can hide permission mistakes.
- Test reading. Open a harmless file in an allowed folder. Success confirms that the account can read that file through the chosen path.
- Test writing only if needed. Create and remove a disposable file in the intended writable folder. Success confirms write permission there, not broader security.
- Test the exclusion. Try to open a folder deliberately excluded from this account. It should remain inaccessible; do not expand its permissions just to make the test pass.
- Test the private-path boundary. For a private-network-only design, disconnect the private connection and attempt a fresh connection to the same private service. It should no longer be reachable through that path.
If an excluded folder opens, review the account’s folder and group permissions. If the service remains reachable after disconnecting the private connection, inspect alternate access paths, sharing links, and firewall rules rather than assuming the private boundary is working.
Keep the local administrator connection available to revoke access and restore settings. These checks validate the intended workflow and permission boundary, not every possible exposure of the NAS.
Diagnose a connection that fails after setup
A connected tunnel proves that the tunnel established, not that the NAS route or file service works. Direct addressing is usually sufficient for a reachable NAS, while automatic discovery and home hostnames may fail when the connection does not carry local discovery or resolve home names.
| Symptom | Likely cause | Next check | Meaning of the result |
|---|---|---|---|
| Nothing at home is reachable | NAS, routing device, or home internet is unavailable | Check power, local NAS access, and the home connection | Failed local access points to a home-side problem |
| Private connection is active, but the NAS address fails | Missing route or NAS-side connection | Check network membership and the configured NAS route | A connected remote client alone is insufficient |
| Access fails on a particular remote network | Overlapping home and remote subnets | Compare the network ranges and review supported routing settings | Overlap can send traffic toward the wrong local network |
| Route exists, but file access fails | Firewall restriction or unavailable file service | Check the service and narrowly scoped firewall rules | Reachability does not prove the file service is allowed |
| Address works, hostname fails | Home-name resolution is unavailable | Check the private connection’s supported naming configuration | Fix naming rather than broadening access |
| NAS is absent from the file-browser sidebar | Discovery does not cross the connection | Enter the reachable address directly | Missing discovery does not establish a connection failure |
| NAS responds, but a share denies access | Incorrect credentials or folder permissions | Check the personal account and intended share permissions | Network access and file authorization are separate |
With routed private connections, the NAS may not appear automatically in File Explorer or Finder. Try the reachable address directly before changing permissions or exposing another service. If addressing works but naming does not, focus on hostname resolution.
For home-network routing, non-overlapping subnets matter. Resolve conflicts using the chosen system’s current documentation, while preserving local recovery access. Changing a public address, using DDNS, or changing a port does not provide authentication by itself.
For an HTTPS certificate error, verify the hostname, certificate validity, and trust configuration using current documentation. Never ignore the warning or disable the firewall to make a connection appear successful.
Plan for slower transfers and interrupted connections
Remote file access is practical for ordinary transfers, but a mounted share may feel slower than it does at home. Downloading from your NAS uses the home internet connection’s upload capacity. Latency, your remote connection, and whether traffic takes a direct or relayed path also affect responsiveness.
For large creative files, consider downloading a working copy and using a deliberate save-back process. Decide which copy is authoritative, finish the upload before treating changes as saved to the NAS, and avoid simultaneous edits that overwrite each other. If your NAS supports synchronization, use its documented conflict-handling features.
Another option is to work on a home computer through a supported private remote-desktop path. This can keep the large files at home and transfer screen updates instead, which may be more usable than moving large graphics files remotely. Keep that remote-desktop service private rather than exposing remote administration publicly.
A synchronized offline copy remains usable without a connection, but it is not live NAS access and may not contain the latest changes. After an interruption, check that transfers and saves completed before deleting the working copy. Remote access gives you another way to reach your files; it does not replace a separate backup.